> ## Documentation Index
> Fetch the complete documentation index at: https://radarlabs-update-tracking-options.mintlify.site/llms.txt
> Use this file to discover all available pages before exploring further.
# Campaigns
Campaign analytics and frequency capping require [iOS SDK v3.19.6](https://github.com/radarlabs/radar-sdk-ios/releases/tag/3.19.6) or above. Client-side geofence notifications are available on [iOS SDK v3.7.6](https://github.com/radarlabs/radar-sdk-ios/releases/tag/3.7.6) and above.
Use campaigns to create location-based notifications effortlessly. Campaigns let you customize your notification content and targeting behavior with ease.
## Quickstart
First, [sign up](https://radar.com/signup) for Radar and get an API key.
To use campaigns with geofences, start by [creating geofences](/geofences#create-geofences) through the dashboard, a CSV import, or the API.
To use campaigns with places, ensure that places are enabled through the [settings page](https://dashboard.radar.com/settings) and "nearby places" is activated. Reach out to your account manager to enable "nearby places" for your project. Then setup nearby places for the project via the [settings page](https://dashboard.radar.com/settings).
To use campaigns with events, ensure that the desired trigger events are enabled through the [settings page](https://dashboard.radar.com/settings).
Once set up, [create your campaigns](https://dashboard.radar.com/geofencing/campaigns) using the dashboard.
## Create campaigns
To create a campaign via the dashboard, navigate to the [campaigns page](https://dashboard.radar.com/geofencing/campaigns) and click **Create**. Provide the campaign's name, notification body, and targeting details. You can target users using either geofences or places.
## Campaign types
### Client side geofence
Use Radar's client side geofence notifications to display a notification on iOS devices when a user enters a geofence. These notifications work with foreground or **"when in use"** permissions, dramatically improving their reachable audience.
Radar's client side geofence notifications make use of location notification triggers on iOS. These triggers work with foreground or **"when in use"** permissions. No location data is collected in the background.
Calls to `Radar.trackOnce()` and `Radar.startTracking()`, which can be configured through remote configuration in the dashboard, will return to the client nearby geofences with notifications, which will then be registered on the device.
Radar only controls the registration of notifications on the device. Once that happens, surfacing notifications is subject to the [system limits and heuristics](https://developer.apple.com/documentation/usernotifications/unlocationnotificationtrigger#overview) that iOS enforces.
If the device is already inside the geofence when its client-side geofence notification is being synced, it will fire upon subsequent entry, not immediately.
## Targeting options
Campaigns allow you to target users based on different triggers. Note not all triggers are available for client side geofence notifications.
Campaign triggers either target geofences or places. Geofences should be targeted using geofence tags or IDs, while places should be targeted by categories or chains. Targeting applies to a user event when all targeting options are true.
You can also target users based on their location-authorization status. For example, you might target a campaign to only target users with foreground-location permission.
For event based campaigns, you can target users based on their device type (iOS, Android, or both).
Under advanced options, you can find User ID (the [external ID](/sdk/ios#identify-user)) based targeting to target individual users.
## Notification configurations
You can configure the notifications Radar sends to users when they enter a geofence or place. Customize the notification body, and optionally, the notification title and the deep link URL.
You can add metadata to the campaign, which will be accessible when the notification is triggered. In iOS the metadata can be accessed from `userNotificationCenter(_:didReceive response:)` with `response.notification.request.content.userInfo["campaignMetadata"]`.
## Frequency Capping
With frequency capping, you can limit the number of notifications a user receives from a campaign. This is useful to prevent excessive notifications for users. To set up frequency capping, navigate to the [setting page](https://dashboard.radar.com/settings). Under the campaigns section, define the maximum number of notifications allowed in the specified time window.
The SDK will only sync up to the frequency cap number of notifications. As such, we'd recommend setting a cap of 2 notifications for a time window of 48 hours instead of 1 notification for 24 hours.
## Analytics (iOS only)
With Radar [Conversions](/api#log-a-conversion), you can log an event whenever a user interacts with a campaign notification.
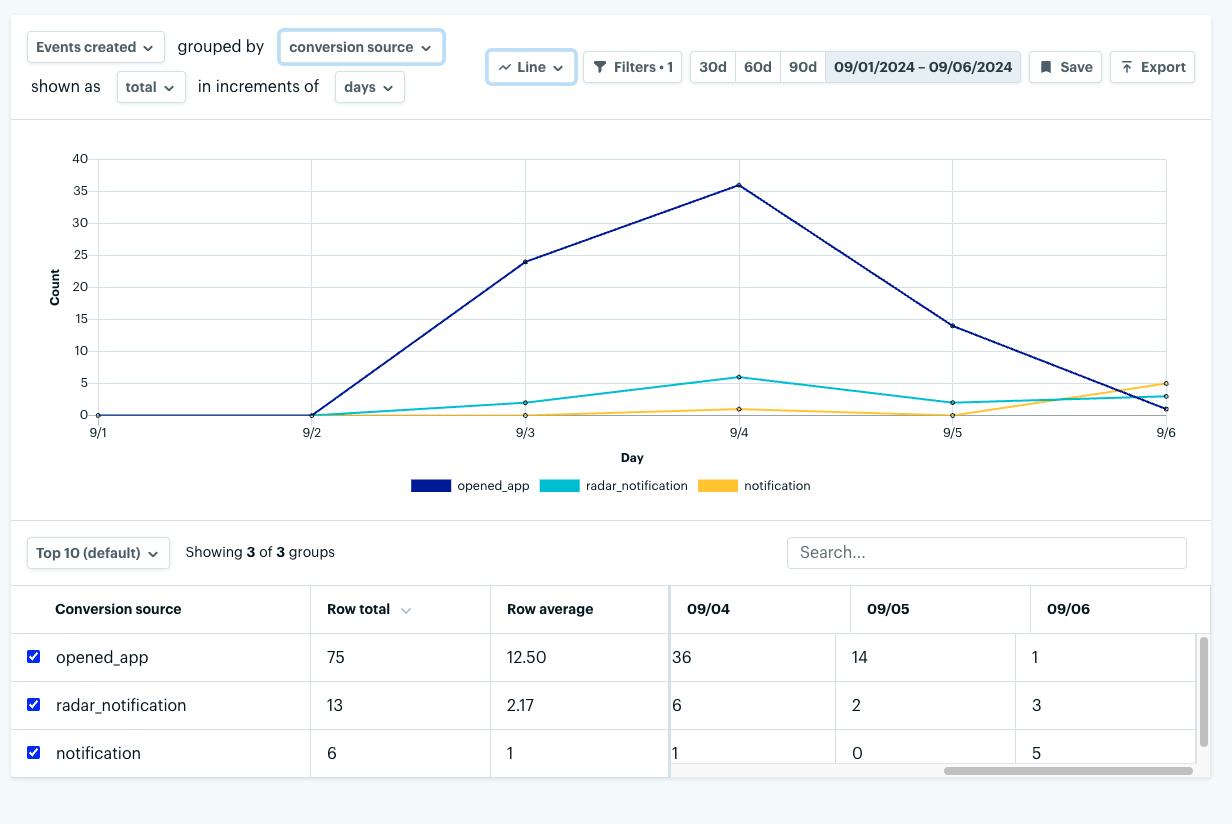
With Radar [Conversions](/api#log-a-conversion), you can also retrieve the source of an *opened\_app* conversion for iOS apps. Within the *metadata* object of the [logged conversion](/sdk/ios#conversions), we will return a *conversion\_source* with either
* **`notification`** (app was opened using an external 3rd party notification)
* **`radar_notification`** (app was opened using the configured on-prem notification):
You can view these campaign conversion analytics by pressing the analytics button on the campaign's page. Alternatively, you can navigate to Geofencing -> Analytics -> Events -> Filters (top right) -> select Type as *opened\_app* -> Apply Filters. From there, select *campaign\_name* from the *grouped\_by* dropdown. See screenshot below:
 ### Automated iOS setup
Radar can associate `opened_app` events with a campaign notification that was clicked on to open the app. To set this up automatically, set the relevant flag on the initialization options.
```swift Swift theme={null}
import UIKit
import RadarSDK
@UIApplicationMain
class AppDelegate: UIResponder, UIApplicationDelegate {
func application(_ application: UIApplication, didFinishLaunchingWithOptions launchOptions: [UIApplication.LaunchOptionsKey: Any]?) -> Bool {
let radarInitializeOptions = RadarInitializeOptions()
radarInitializeOptions.autoLogNotificationConversions = true
Radar.initialize(publishableKey: "prj_test_pk_...", options: radarInitializeOptions)
return true
}
}
```
```c Objective-C theme={null}
#import "AppDelegate.h"
@import RadarSDK;
@implementation AppDelegate
- (BOOL)application:(UIApplication *)application didFinishLaunchingWithOptions:(NSDictionary *)launchOptions {
RadarInitializeOptions *radarInitializeOptions = [[RadarInitializeOptions alloc] init];
radarInitializeOptions.autoLogNotificationConversions = YES;
[Radar initializeWithPublishableKey:@"prj_test_pk_..." options:radarInitializeOptions];
return YES;
}
@end
```
### Manual iOS setup
Alternatively, perform the manual setup:
```swift Swift theme={null}
func userNotificationCenter(_ center: UNUserNotificationCenter, didReceive response: UNNotificationResponse) async {
Radar.logConversion(response: response)
}
```
```c Objective-C theme={null}
- (void)userNotificationCenter:(UNUserNotificationCenter *)center didReceiveNotificationResponse:(UNNotificationResponse *)response withCompletionHandler:(void (^)(void))completionHandler {
[Radar logConversionWithNotificationResponse:response];
completionHandler();
}
```
## Deep linking (iOS only)
Radar's client side geofence notifications can be used for deep linking. This means that you can use Radar's deep linking functionality to open a specific view via on premise notification taps.
Set up deep linking from the Radar's Dashboards by adding the **`radar:notificationURL`** to the `URL Schemes` of the desired navigation view of your app.
### Automated iOS setup
Radar's iOS SDK can automatically set up deep linking for you. To enable this feature, set the `autoHandleNotificationDeepLinks` option to `true` in the Radar `initialize` call.
```swift Swift theme={null}
import UIKit
import RadarSDK
@UIApplicationMain
class AppDelegate: UIResponder, UIApplicationDelegate {
func application(_ application: UIApplication, didFinishLaunchingWithOptions launchOptions: [UIApplication.LaunchOptionsKey: Any]?) -> Bool {
let radarInitializeOptions = RadarInitializeOptions()
radarInitializeOptions.autoHandleNotificationDeepLinks = true
Radar.initialize(publishableKey: "prj_test_pk_...", options: radarInitializeOptions)
return true
}
}
```
```c Objective-C theme={null}
#import "AppDelegate.h"
@import RadarSDK;
@implementation AppDelegate
- (BOOL)application:(UIApplication *)application didFinishLaunchingWithOptions:(NSDictionary *)launchOptions {
RadarInitializeOptions *radarInitializeOptions = [[RadarInitializeOptions alloc] init];
radarInitializeOptions.autoHandleNotificationDeepLinks = YES;
[Radar initializeWithPublishableKey:@"prj_test_pk_..." options:radarInitializeOptions];
return YES;
}
@end
```
It is recommended to use the automatic setup in conjugation with the `RadarURLDelegate` to handle the URL open. This implementation provides the most light way approach to get started with deep linking.
### Manual iOS setup
If you want to set up deep linking manually, you can do so by adding the following line to your `UNUserNotificationCenterDelegate` implementation.
```swift Swift theme={null}
func userNotificationCenter(_ center: UNUserNotificationCenter, didReceive response: UNNotificationResponse) async {
Radar.openURLFromNotification(response.notification)
}
```
```c Objective-C theme={null}
- (void)userNotificationCenter:(UNUserNotificationCenter *)center didReceiveNotificationResponse:(UNNotificationResponse *)response withCompletionHandler:(void (^)(void))completionHandler {
[Radar openURLFromNotification:response.notification];
completionHandler();
}
```
### Automated React Native setup (iOS only)
Radar's React Native SDK can automatically set up deep linking for you. To enable this feature, set the `autoHandleNotificationDeepLinks` option to `true` in the `radarInitializeOptions` via the `AppDelegate.mm`.
```c# theme={null}
- (BOOL)application:(UIApplication *)application didFinishLaunchingWithOptions:(NSDictionary *)launchOptions
{
self.moduleName = @"main";
self.initialProps = @{};
BOOL res = [super application:application didFinishLaunchingWithOptions:launchOptions];
RadarInitializeOptions *radarInitializeOptions = [[RadarInitializeOptions alloc] init];
radarInitializeOptions.autoHandleNotificationDeepLinks = YES;
[Radar nativeSetup:radarInitializeOptions];
return res;
}
```
### Handle system deep link
Opening the notification will result in the SDK calling `[application openURL:url options:@{} completionHandler:nil];` This will open the URL in the app if it is registered for the scheme, or open the URL in the browser if it is not. Developers should handle this by handling the [custom URL scheme](https://developer.apple.com/documentation/xcode/defining-a-custom-url-scheme-for-your-app) or [universal link](https://developer.apple.com/documentation/xcode/supporting-universal-links-in-your-app) in their app. React Native developers should also implement the native iOS handling of the deep link in their app.
## Support
Have questions or difficulties with campaigns? Contact us at [radar.com/support](https://radar.com/support).
### Automated iOS setup
Radar can associate `opened_app` events with a campaign notification that was clicked on to open the app. To set this up automatically, set the relevant flag on the initialization options.
```swift Swift theme={null}
import UIKit
import RadarSDK
@UIApplicationMain
class AppDelegate: UIResponder, UIApplicationDelegate {
func application(_ application: UIApplication, didFinishLaunchingWithOptions launchOptions: [UIApplication.LaunchOptionsKey: Any]?) -> Bool {
let radarInitializeOptions = RadarInitializeOptions()
radarInitializeOptions.autoLogNotificationConversions = true
Radar.initialize(publishableKey: "prj_test_pk_...", options: radarInitializeOptions)
return true
}
}
```
```c Objective-C theme={null}
#import "AppDelegate.h"
@import RadarSDK;
@implementation AppDelegate
- (BOOL)application:(UIApplication *)application didFinishLaunchingWithOptions:(NSDictionary *)launchOptions {
RadarInitializeOptions *radarInitializeOptions = [[RadarInitializeOptions alloc] init];
radarInitializeOptions.autoLogNotificationConversions = YES;
[Radar initializeWithPublishableKey:@"prj_test_pk_..." options:radarInitializeOptions];
return YES;
}
@end
```
### Manual iOS setup
Alternatively, perform the manual setup:
```swift Swift theme={null}
func userNotificationCenter(_ center: UNUserNotificationCenter, didReceive response: UNNotificationResponse) async {
Radar.logConversion(response: response)
}
```
```c Objective-C theme={null}
- (void)userNotificationCenter:(UNUserNotificationCenter *)center didReceiveNotificationResponse:(UNNotificationResponse *)response withCompletionHandler:(void (^)(void))completionHandler {
[Radar logConversionWithNotificationResponse:response];
completionHandler();
}
```
## Deep linking (iOS only)
Radar's client side geofence notifications can be used for deep linking. This means that you can use Radar's deep linking functionality to open a specific view via on premise notification taps.
Set up deep linking from the Radar's Dashboards by adding the **`radar:notificationURL`** to the `URL Schemes` of the desired navigation view of your app.
### Automated iOS setup
Radar's iOS SDK can automatically set up deep linking for you. To enable this feature, set the `autoHandleNotificationDeepLinks` option to `true` in the Radar `initialize` call.
```swift Swift theme={null}
import UIKit
import RadarSDK
@UIApplicationMain
class AppDelegate: UIResponder, UIApplicationDelegate {
func application(_ application: UIApplication, didFinishLaunchingWithOptions launchOptions: [UIApplication.LaunchOptionsKey: Any]?) -> Bool {
let radarInitializeOptions = RadarInitializeOptions()
radarInitializeOptions.autoHandleNotificationDeepLinks = true
Radar.initialize(publishableKey: "prj_test_pk_...", options: radarInitializeOptions)
return true
}
}
```
```c Objective-C theme={null}
#import "AppDelegate.h"
@import RadarSDK;
@implementation AppDelegate
- (BOOL)application:(UIApplication *)application didFinishLaunchingWithOptions:(NSDictionary *)launchOptions {
RadarInitializeOptions *radarInitializeOptions = [[RadarInitializeOptions alloc] init];
radarInitializeOptions.autoHandleNotificationDeepLinks = YES;
[Radar initializeWithPublishableKey:@"prj_test_pk_..." options:radarInitializeOptions];
return YES;
}
@end
```
It is recommended to use the automatic setup in conjugation with the `RadarURLDelegate` to handle the URL open. This implementation provides the most light way approach to get started with deep linking.
### Manual iOS setup
If you want to set up deep linking manually, you can do so by adding the following line to your `UNUserNotificationCenterDelegate` implementation.
```swift Swift theme={null}
func userNotificationCenter(_ center: UNUserNotificationCenter, didReceive response: UNNotificationResponse) async {
Radar.openURLFromNotification(response.notification)
}
```
```c Objective-C theme={null}
- (void)userNotificationCenter:(UNUserNotificationCenter *)center didReceiveNotificationResponse:(UNNotificationResponse *)response withCompletionHandler:(void (^)(void))completionHandler {
[Radar openURLFromNotification:response.notification];
completionHandler();
}
```
### Automated React Native setup (iOS only)
Radar's React Native SDK can automatically set up deep linking for you. To enable this feature, set the `autoHandleNotificationDeepLinks` option to `true` in the `radarInitializeOptions` via the `AppDelegate.mm`.
```c# theme={null}
- (BOOL)application:(UIApplication *)application didFinishLaunchingWithOptions:(NSDictionary *)launchOptions
{
self.moduleName = @"main";
self.initialProps = @{};
BOOL res = [super application:application didFinishLaunchingWithOptions:launchOptions];
RadarInitializeOptions *radarInitializeOptions = [[RadarInitializeOptions alloc] init];
radarInitializeOptions.autoHandleNotificationDeepLinks = YES;
[Radar nativeSetup:radarInitializeOptions];
return res;
}
```
### Handle system deep link
Opening the notification will result in the SDK calling `[application openURL:url options:@{} completionHandler:nil];` This will open the URL in the app if it is registered for the scheme, or open the URL in the browser if it is not. Developers should handle this by handling the [custom URL scheme](https://developer.apple.com/documentation/xcode/defining-a-custom-url-scheme-for-your-app) or [universal link](https://developer.apple.com/documentation/xcode/supporting-universal-links-in-your-app) in their app. React Native developers should also implement the native iOS handling of the deep link in their app.
## Support
Have questions or difficulties with campaigns? Contact us at [radar.com/support](https://radar.com/support).